Creating drywall structures, you can divide a large room into two comfortable zones. The material allows you to translate design solutions into reality, creating more than just ordinary partitions, and various curly options.
- Plasterboard partitions – advantages
- DIY plasterboard partition
- Making a partition – instruction and video
- Preparation for the installation of the partition – what to consider?
- Let's get down to business
- Sheathing is important
- Sealing and plastering of drywall
- Installation instructions for plasterboard partitions video
Plasterboard partitions – advantages
Wondering why you should use drywall partitions? Let's take a look at the pros and cons.
- The partition will be lightweight, while having good stability and load-bearing capacity.
- Possesses good noise insulation characteristics, resistant to moisture.
- With excess moisture, drywall absorbs it, and if the air gets dry – gives away, thereby maintaining an optimal indoor climate.
- It is convenient to hide communication systems inside the partition, so that they do not spoil the general view.
- It's easy enough to work with him, it has a relatively low cost.
- Drywall is completely environmentally friendly, it can be safely used for finishing household premises, it does not cause allergies and does not have an unpleasant odor.
Installation of simple partitions does not require a lot of experience and any special skills. Repair work can be done even alone. If all actions are performed carefully, drywall partitions will not differ from the wall.
There is, of course, a drawback to plasterboard partitions., you cannot hang heavy objects on such a wall.
see also: Instructions on how to choose and install a switch and a socket
DIY plasterboard partition
Making a partition – instruction and video
It is quite simple to introduce novelty and renovate your home.. At the same time, large financial costs and a bunch of hired workers will not be needed.. You can modify your abode with such a magnificent material., like drywall. He lets on 100% use your imagination when decorating a room. With its help, you can make different design designs in the interior.. It's quite easy to "organize" niches, shelves and various designs. But the most popular are partitions made of this material.. Plasterboard partition do it yourself - an easy way to give a "second" breath to an apartment or house.

Very often the partitions are not solid, and with cutouts for that, to make a shelf or niche. As a result, such a partition can perfectly fit into the overall design of the room.. It will be simple, and original, and inexpensive. The biggest plus of this update is, that the partition can be done in a fairly short period of time on your own, without attracting additional labor. Nevertheless, there are many moments, which you need to know before starting work. There are certain rules, which will allow you to perform the intended work with high quality.

Drywall itself is lightweight, durable and, simultaneously pliable material for work. It is very easy to modify it., and make not only even, but also a curved design, which will further decorate the interior of the room. Formation of the future "wall" is an interesting and responsible activity at the same time. But, if everything is done correctly, the result will definitely please.
Preparation for the installation of the partition – what to consider?
The very first step to, to make your dreams come true it's a sheet and a pencil. They will help to approximately imagine, what exactly can be done on the area of a certain room. And for that, in order to make a drawing on a scale and make markings on paper, you must use:
- roulette,
- plumb,
- level,
- ruler.
With their help, you can correctly transfer all the data to paper and make calculations. After that it will be possible to transfer all these calculations to the future wall.. It is on the accuracy of these calculations that it will depend on how beautiful and even the wall will look.. Plasterboard partitions must be thought out in advance in terms of design and color..
It is also worth considering the fact, or partition, which is being built, will be longer, than the guide profile itself. If this is the situation, then initially it is worth drawing a straight line and, mark it from the ceiling with a special cord. In addition, it is worth remembering that, how heavy the objects will be, with which the future wall will be formed and how much weight will be hung on it (paintings, furniture, etc). The more decor and decoration items will be on the wall, the stronger it will be necessary to make the frame (reduce the distance between profiles, think over inserts that will later help fix the item to the wall). Possibly increasing the number of layers of drywall to, to make the design more stable.
As such, the partitions themselves can be made with single or double frame. What is the difference between them?
- Single – This frame of profiled metal. This kind of design will consist of a row of racks for further work. It is in this frame will be further secured drywall sheets for the emergence of the wall. The distance between these walls is filled with insulating material qualities (it is best to use mineral wool).
- Double frame and built of two separate structures. They will be installed next to each other, but it will be spacing between them. this type of frame is made in view of the, that in the space between the structures will be laid the necessary communications. It is possible to use it and to, to arrange a sliding door made of plasterboard. They can be opened inside the walls.
note! It is possible the use of such partitions in the bathroom. but, If you choose this option it is worth remembering the humidity in the bathroom. To this end, it provides for a special drywall, which is not afraid of water (gypsum plasterboard green). Also, in order, to extend the life of the new installation, a good option would be the installation of forced ventilation. Thus, you can save on repairs in the future..
Let's get down to business
 To, to independently make installation of drywall and place the wall in the room, used rack and a guide profile (PS and PN). To install taken PS - section 50 on 50 mm and the cross section 50 on 40 mm for PN. The guide profile is attached to the ceiling. This is usually used plastic dowels. The desired length of about half of their step. More desirable.

marking, naturally, performed in advance. After the installation is done PS. Their step is to be 60 cm. This distance observed between the centers of the profiles. Vertical stand will be attached to the supporting wall itself. For optimum mounting in this case it is necessary to use the bugs. So called self-tapping screws, in which the flat hat. Very much in this matter will help to Prosekatel Profile gispokartona.

Quite often in the installation being used polymeric tape. It is well reduces vibration, which may be on the wall of plasterboard. In addition, it significantly increase the sound insulation between rooms. Of course, in this embodiment possible to use a special silicone sealant. It is usually applied to the abutting surfaces. Its use can greatly reduce the potential risk of, on the walls appear cracks wall. But for this it is necessary to attach the partition and the base base well. It’s also important, so that the vibration effect on the wall is also reduced. Additionally recommended strengthening strut profiles doorway. Typically, this is great wooden beam. Although perfectly come and additional profile. If the choice has stopped on a bar, then self-tapping screws for wood are used to secure it.
Regarding the choice between a bar and a metal profile, then there is no definite answer. Both materials are excellent, but in most cases, many use it Metalloprofil. To do this, there are a number of indicators. Initially, it will not affect the moisture and temperature changes. Wood, in this case, can change their size and volume. Because of this discrepancy may occur at the joints of the sheets of plasterboard. About the duration of the service life of the material is not worth it. The metal profile lasts much longer. And most importantly - in the metal profile there are already ready holes for wires from the mains.

Rack profiles of the door opening should be further strengthened. For these purposes, we use another profile or a wooden beam. Wooden bar fasten screws for wood.
At the end of work with vertical racks, you can begin to work with horizontal jumpers. It is on them that the joints of sheets of drywall will converge. It is also worth remembering, that all jumpers must be fixed exactly in level.
Sheathing is important
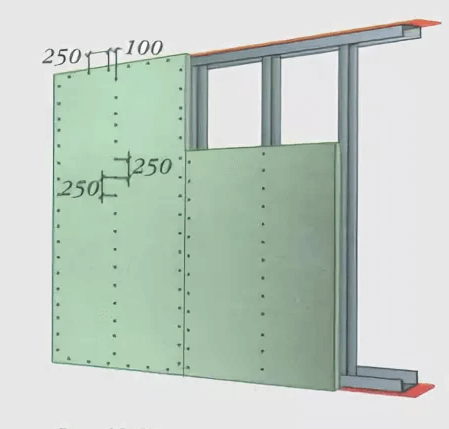
For, to make a partition and installation of drywall, a special wall version of the material is perfect. Its thickness is 12,5 centimeters. The best thing to do checkerboard trim. In this case, gypsum board should be put on the previously planned location. Clear miscalculation - the main thing in this matter. For fixing screws twisted perpendicular to the plane of the skin. The distance between them and a half centimeters. Medium walk around 30 centimeters. It is very important to carefully tighten the screws. Their hat should not go into the drywall, than a millimeter.
Montazh gipsokrtona - only, that it is desirable to do with an assistant. For, to cut sheets, You can use the ruler and knife construction. If you want to make a hole under the wall socket or switch, it is best to use a drill. For such action provides a special attachment to it.

Sealing and plastering of drywall
Well, the last step in installing the partition will be sealing joints on the new wall. For, what to do the job quality, putty is placed directly on the docking panels. After this layer must be covered with a special reinforcing material. Another layer of putty is usually applied over it.. It is also important not to forget to handle the cap screws from the. What else comes to putty, so it stages its application. The first is best to plug screws and joints, who formed. The second stage involves the application of putty to the entire cavity of the partition. For, so that cracks do not form in those places, where were the joints, need to use serpyanka.
When the putty dries, it must be well sanded. The best option for this is sandpaper with figurativeness up to 120 units. You can do the whole procedure manually or use a special vibrating grinder. Doing all the work manually is more difficult and time consuming. If this option is chosen, then you can wrap the sanding paper on the beam and walk along the new wall. In this way, all existing irregularities can be removed.. The very last stage - the use of a primer on the partitions of our drywall. Since the dust is removed from the wall surface. If you do this simple procedure, the paint will be spent much more economical. Glue for wallpaper will also be applied in smaller amounts, as wallpaper "will fall" more smoothly and evenly.
Thus, without much effort, you can create a new design in the room. In these new walls can be made interesting niche, windows or just decoration. The costs of such a procedure will be affordable even for a family with a small income., and the new design will please the eyes of the owners of the house and guests for more than one year, who visit this cloister.
Installation instructions for plasterboard partitions video
soplasterboard partitionis ready, but we suggest that before starting work, watch a video for this article in which you will see firsthand how it goesinstallation from GLK.